


Learning About Art
This is an overview of what Art is, and how it shapes the world.
- Know what art is.
- Spot art and talk about it.
Ancient Art
Learn about the origins of art from prehistoric and ancient art samples.
- Review the earliest examples of art and culture to appreciate art history.
- Create group art
Introduction to Drawing
Overview of drawing principles, tools, and practice with shapes and strokes.
- Learn about drawing tools.
- Practice drawing shapes and types of strokes.
Beginner Drawing
Beginner and Two-dimensional (2D) drawing skills and practice.
- Students learn how to draw in 2D
- Practice beginner drawing
3D Drawing
Children learn the basics of how to draw in 3 dimensions. Not only important for art, but this is also important in many fields in the future.
- Learn about the 3rd axis.
- How to make a drawing appear 3D
- Practice 3D drawing
Color, Shading, and Shadows
Learn to use colors, shadows, and shading in drawing to bring the images to life.
- Students learn about and practice techniques with color and shading.
- Use shadows to make something look more realistic.
Scribble Drawing
Young students learn how to make scribble drawings that look like something other than just scribbles.
- Learn techniques to make scribble drawings
- Practice without reference and with reference
Drawing Animals
Children will learn how to draw animals and get several guided and non-guided opportunities to practice.
- Learn techniques for drawing animals
- How to make animals look realistic.
Drawing Structures
Children learn to draw structures like homes, buildings, bridges, and street views.
- Using sharper lines, children will learn to draw objects that are man-made and have stronger definitions.
- Draw a 3D building or structure.
Common Art Types
Here's a breakdown of different areas of art.
Drawing:
Creating images using lines and shapes.
Painting
Using colors and brushes to bring scenes to life.
Sculpting
Shaping and molding materials like clay or stone into three-dimensional artworks.
Printmaking
Creating multiple copies of an image using techniques like carving or etching.
Photography
Capturing moments and telling stories through the lens of a camera.
Collage
Combining different materials like paper, fabric, and photographs to create visually interesting compositions.
Ceramics
Creating pottery and ceramics by shaping and firing clay.
This breakdown allows for easy comprehension and visual separation of each area of art, helping students understand the distinct characteristics of each medium.
Collage Project
Creating Collage Stories
Objective: Students will create collages using common items found in the room and provided materials, constructing scenes that tell stories. They will practice visual storytelling and present their collages, narrating the stories behind their scenes.
Materials:
- Assorted items from the classroom (e.g., paper, magazine cutouts, fabric scraps, buttons, bottle caps)
- Glue sticks
- Scissors
- Construction paper or cardboard as a base for collages
- Presentation space (easel or bulletin board)
Procedure:
1. Introduction (5 minutes)
- Begin the lesson by discussing the power of storytelling through art and how visuals can convey narratives.
- Share examples of collages that tell stories, emphasizing the different elements and techniques used.
2. Materials Explanation (5 minutes)
- Show the assortment of items available for creating the collages.
- Explain how each item can be used to represent characters, objects, or settings within the scene.
3. Instructions (10 minutes)
- Instruct students to brainstorm ideas for their collage scenes and the stories they want to depict.
- Encourage them to consider different themes, emotions, or events they would like to convey through their artwork.
4. Collage Creation (25 minutes)
- Distribute construction paper or cardboard as a base for the collages.
- Students should select and arrange the items provided to create their scenes, gluing them onto the base.
- Encourage experimentation and creativity in the placement and combination of materials.
5. Presentation and Storytelling (15 minutes)
- Provide a presentation space (easel or bulletin board) for students to display their collages.
- One by one, ask students to present their collages, describing the story behind their scene.
- Encourage them to explain the symbolism, characters, settings, and any emotions portrayed.
6. Reflection and Discussion (10 minutes)
- Facilitate a discussion on the power of visual storytelling and how the collages effectively conveyed stories.
- Ask students to share their thoughts on the process and any challenges or discoveries they encountered.
7. Conclusion (5 minutes)
- Summarize the importance of storytelling in art and how the combination of materials can create powerful narratives.
- Congratulate students on their creativity and storytelling skills.
Extension: Encourage students to write a short written narrative or poem inspired by their collages, further exploring the stories they depicted.
Assessment: Assess student understanding and participation based on their ability to create visually engaging collages that effectively convey stories, as well as their oral presentation skills in narrating the stories behind their scenes.
Hieroglyphicss Art Project
Objective: To create a unique hieroglyphic representation of your name, drawing inspiration from the ancient Egyptian art form.
Materials Needed:
1. Drawing paper
2. Pencil
3. Eraser
4. Colored pencils or markers
5. Reference chart for English alphabet to hieroglyphics translation
Instructions:
Prep. If you would like to do this project over two days, you can have the students make paper into parchment as in the video and let it dry until the next day.
1. Research and Understand Hieroglyphics: Begin by watching the provided video that explains the art of hieroglyphics and how to translate the English alphabet into hieroglyphic symbols. Pay close attention to the shapes, forms, and meanings of the symbols.
2. Translate Your Name: Using the reference chart provided in the video, translate each letter of your name into the corresponding hieroglyphic symbol. Write these symbols down on a piece of paper.
3. Sketch Your Hieroglyphics: On your drawing paper, begin to sketch out the hieroglyphic symbols that represent your name. Remember, hieroglyphics were often drawn in a horizontal or vertical arrangement, so consider this when planning your layout.
4. Refine and Color: Once you are satisfied with your sketch, refine the lines and add color to your symbols using colored pencils or markers. You can choose to use traditional Egyptian colors like gold, blue, and red, or you can choose colors that represent you.
5. Reflection: After you have completed your hieroglyphic art piece, take a moment to reflect on the process. What did you learn about this ancient form of communication? How does your hieroglyphic name represent you?
Art Project: Now Practice Shapes
Shape Mastery Through Art
Objective: To practice and master the basic shapes and lines introduced in the video.
Materials Needed:
1. Drawing paper (multiple sheets)
2. Pencil
3. Eraser
Instructions:
1. Warm-up: Start with a warm-up exercise to practice drawing straight lines. Draw a series of dots on your paper and connect them using straight lines. Remember to keep your wrist straight and use your arm to draw. Practice this until you feel comfortable with your line work.
2. Basic Shapes: On a new sheet of paper, practice drawing the three basic shapes: circles, squares (boxes), and triangles. Draw each shape multiple times until you feel confident in your ability to create these shapes consistently.
3. 3D Shapes: Now, let's move to three-dimensional shapes. Using the techniques from the video, practice drawing cubes, spheres, cones, and cylinders. Remember, these shapes are just 3D versions of the basic shapes you practiced earlier. Draw each 3D shape from different angles to understand their structure better.
4. Shape Combinations: On another sheet of paper, try to combine these basic shapes to create more complex objects. For example, you can combine a cylinder and a cone to create a simple tree shape, or combine multiple cubes to create a building. This exercise will help you understand how basic shapes can be used to draw complex objects.
5. Reflection: After you have completed your drawings, take a moment to reflect on your work. Which shapes were the easiest to draw? Which were the most challenging? What did you learn about the relationship between basic shapes and more complex objects?
Submission: Submit all your practice sheets at the end of the project. Make sure to label each sheet with the type of shapes you practiced on it.
Remember, the goal of this project is not to create perfect drawings, but to practice and understand the basic shapes that make up everything we draw. Happy drawing!
Art Vocabulary Reading
Some terms that are associated with drawing. You can study these on the slide flashcards given in the next part of the lesson.
- Sketch - A quick drawing done to capture the basic shape and form of an object or scene.
- Shade - The use of light and dark values to create the illusion of depth and dimension in a drawing.
- Perspective - The technique of creating the illusion of depth and distance on a flat surface.
- Proportion - The relationship between the size and placement of different elements in a drawing.
- Composition - The arrangement of elements within a drawing to create a pleasing and balanced overall effect.
- Contour - The outline or edge of an object or figure in a drawing.
- Hatching - The use of closely spaced parallel lines to create shading in a drawing.
- Blending - The technique of smoothing out harsh lines or edges in a drawing to create a more realistic effect.
- Still life - A drawing or painting of inanimate objects arranged together for artistic purposes.
- Portrait - A drawing or painting of a person's face or figure.
2D Drawing For New Artists
2D Drawing: Let's Learn About Art
Drawing is like talking, but instead of words, we use lines, shapes, and colors to tell our story. In this reading, we'll learn about 2D drawing. That's when we make pictures that look like they have height and width, but they're flat like a piece of paper.
2D stands for 2-dimensional. This means a picture has a length and a width but no depth that makes it look more real. A piece of paper is 2D and a box is 3D.
Line: A line is like a path made by a moving pencil. It can be straight, curved, or zigzag. Lines can be thick or thin, long or short, and they can go in any direction. We use lines to make shapes, outlines, and add details to our drawings.
Shape: A shape is what you see when you draw the outline of something. It can be a shape you know, like a square, circle, or triangle, or it can be a shape you see, like a tree or a cloud. Shapes can be simple or tricky, and we use them a lot when we draw.
Outline: An outline is like the edge or border of a shape. It shows us where the shape starts and ends. Outlines help us see the shape clearly.
Contour: Contour is a fancy word for the lines that show the edges and curves of an object. These lines help make our drawings look more real. By looking closely at the contours of an object, we can draw it just the way it is.
Form: Form is how we make things look 3D, or three-dimensional, in our 2D, or two-dimensional, drawings. We can use shading, hatching, and other tricks to make things look solid and real.
Texture: Texture is how something feels when you touch it. It can be rough, smooth, bumpy, or shiny. When we draw, we can use lines, dots, or shading to make things look like they have different textures.
Proportion: Proportion is about size and how things relate to each other in a drawing. It's important to get the proportions right to make our drawings look real. We do this by looking at how big or small different parts of an object are compared to each other.
Composition: Composition is how we arrange things in our drawing. It's like deciding where to put furniture in a room. A well-planned composition makes our drawing look nice and interesting.
Foreground and Background: In a drawing, the foreground is what's up close, and the background is what's far away. We can use tricks like size, overlapping, and perspective to make our drawings look like they have depth.
Perspective: Perspective is a way to make our 2D drawings look 3D. It's like drawing things the way we see them, considering their size, position, and how far they are from us. Perspective makes our drawings look more real.
Symmetry: Symmetry is when one half of something looks just like the other half. It's like looking in a mirror. Symmetry can make our drawings look balanced and stable.
Color: Color makes our drawings pop and look interesting. It can make us feel different emotions and tell a story. We can use different colors and combinations to set the mood in our drawings.
Shading: Shading is how we add light and dark to our drawings. By looking at how light hits objects, we can make our drawings look 3D. We can use hatching, cross-hatching, or blending to shade our drawings.
Hatching and Cross-Hatching: Hatching and cross-hatching are ways to shade our drawings. Hatching is drawing lines close together, and cross-hatching is drawing lines that cross each other. These techniques can make our drawings look more 3D.
In the end, 2D drawing is a fun way to show our creativity and how we see the world. By learning about lines, shapes, outlines, contours, form, texture, proportion, composition, foreground, background, perspective, symmetry, color, shading, hatching, and cross-hatching, we can become great artists.
Practice Drawing From Video Examples
Drawing a Dragon Eye or a Human Face
Objective: To create a detailed drawing of either a dragon eye or a human face, using the techniques learned from the video tutorials.
Materials Needed:
1. Drawing paper
2. Pencil
3. Eraser
4. Colored pencils or markers
Instructions:
1. Choose Your Subject: Decide whether you want to draw a dragon eye or a human face. Remember, each subject offers its own unique challenges and opportunities for creativity.
2. Watch the Tutorial: Watch the corresponding video tutorial again. Pay close attention to the techniques and tips provided by the instructor.
3. Sketch Your Drawing: Start by sketching the basic shapes of your chosen subject. For the dragon eye, focus on the shape of the eye and the details within it. For the human face, start with the basic shape of the face and then add the features (eyes, nose, mouth, etc.).
4. Add Details: Once you have your basic sketch, start adding details. Remember to consider the texture and shading techniques you learned in the video tutorials.
5. Color Your Drawing: If you're drawing the dragon eye, use a variety of shades to make the eye stand out. If you're drawing a human face, consider the skin tone and the colors of the features.
6. Review and Refine: Look over your drawing and make any necessary adjustments. Don't be afraid to erase and redraw parts of your drawing to get it just right.
Submission: Submit your completed drawing along with a brief reflection on the process. What did you learn? What was challenging? What would you do differently next time?
Evaluation: You will be evaluated on your understanding of the techniques demonstrated in the video tutorials, the accuracy of your drawing, and your creativity.
This project is a great opportunity to practice your drawing skills and explore your creativity. Enjoy the process of creating your dragon eye or human face!
Make a Scribble Drawing Project #1
Scribble Drawing Project
After students have watched the scribble drawing video, ask them to each make their own scribble drawing.
You will need:
- Markers and/or Crayons
- White Paper
- Construction Paper
- Glue
- Scissors
Teaching Tips:
- Be sure they do not scribble too much. You want natural shapes to form that can be colored.
- Talk about colors and color palettes. What colors look good together?
Scribble Drawing Project #2
Object Scribble Drawing - No Color
After students have watched the apple scribble drawing video, ask them to make 3 different scribble drawings of an item, such as an apple, basketball, book, etc. Each one should take less than 10 minutes, and hopefully by the third drawing they improve some.
You will need:
- Pencil or Fine Pen
- White Paper
Teaching Tips:
- Give feedback on the first and second, with an eye on improving the technique.
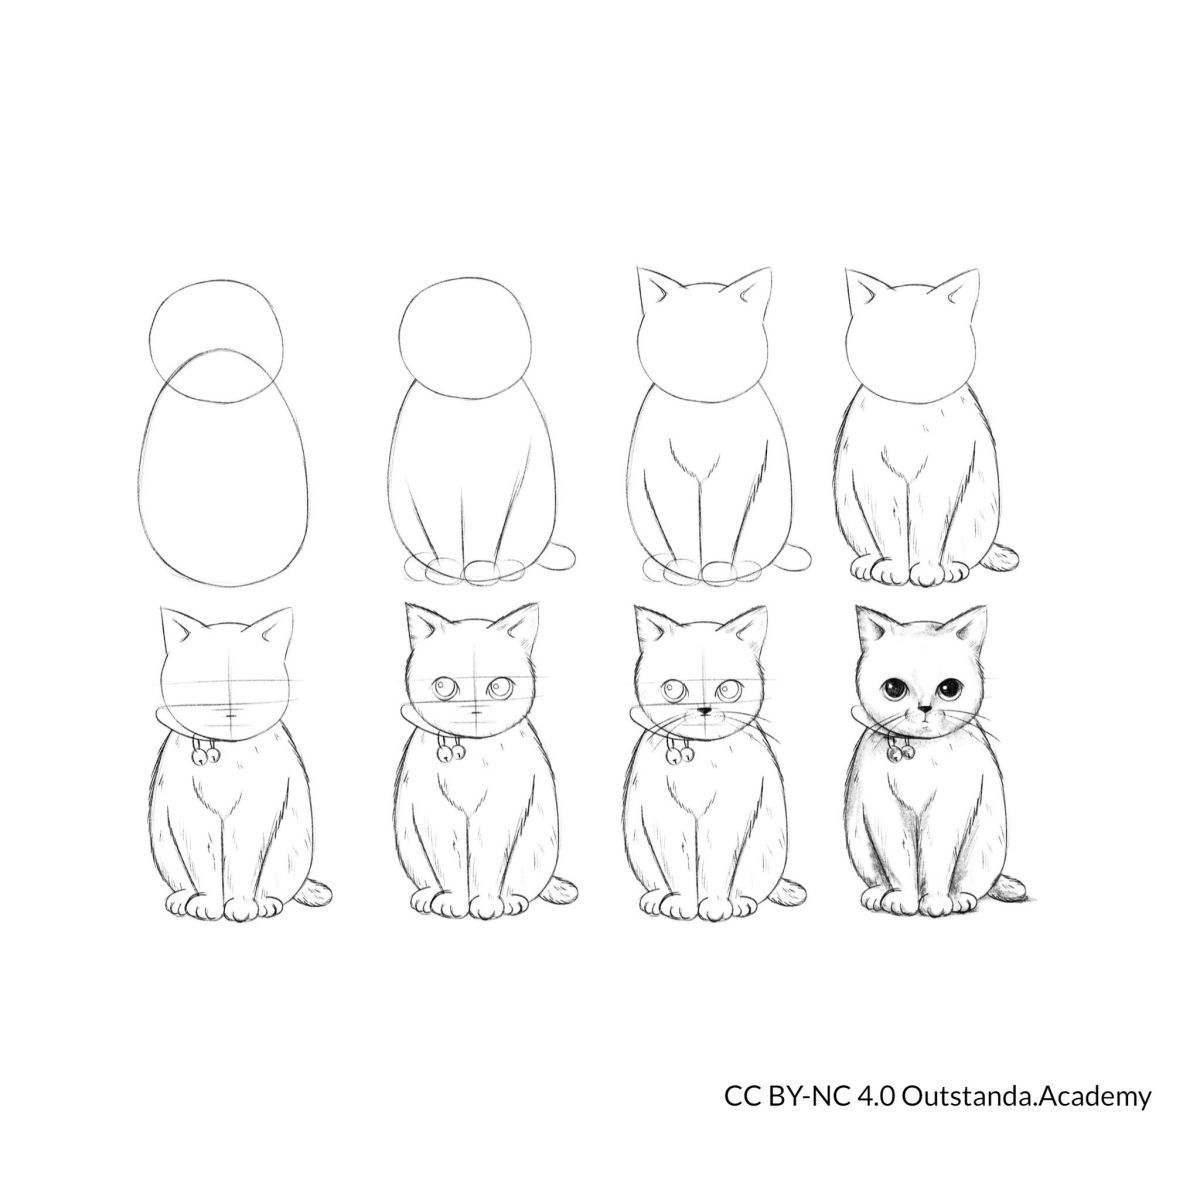
Draw a Cat - Step by Step
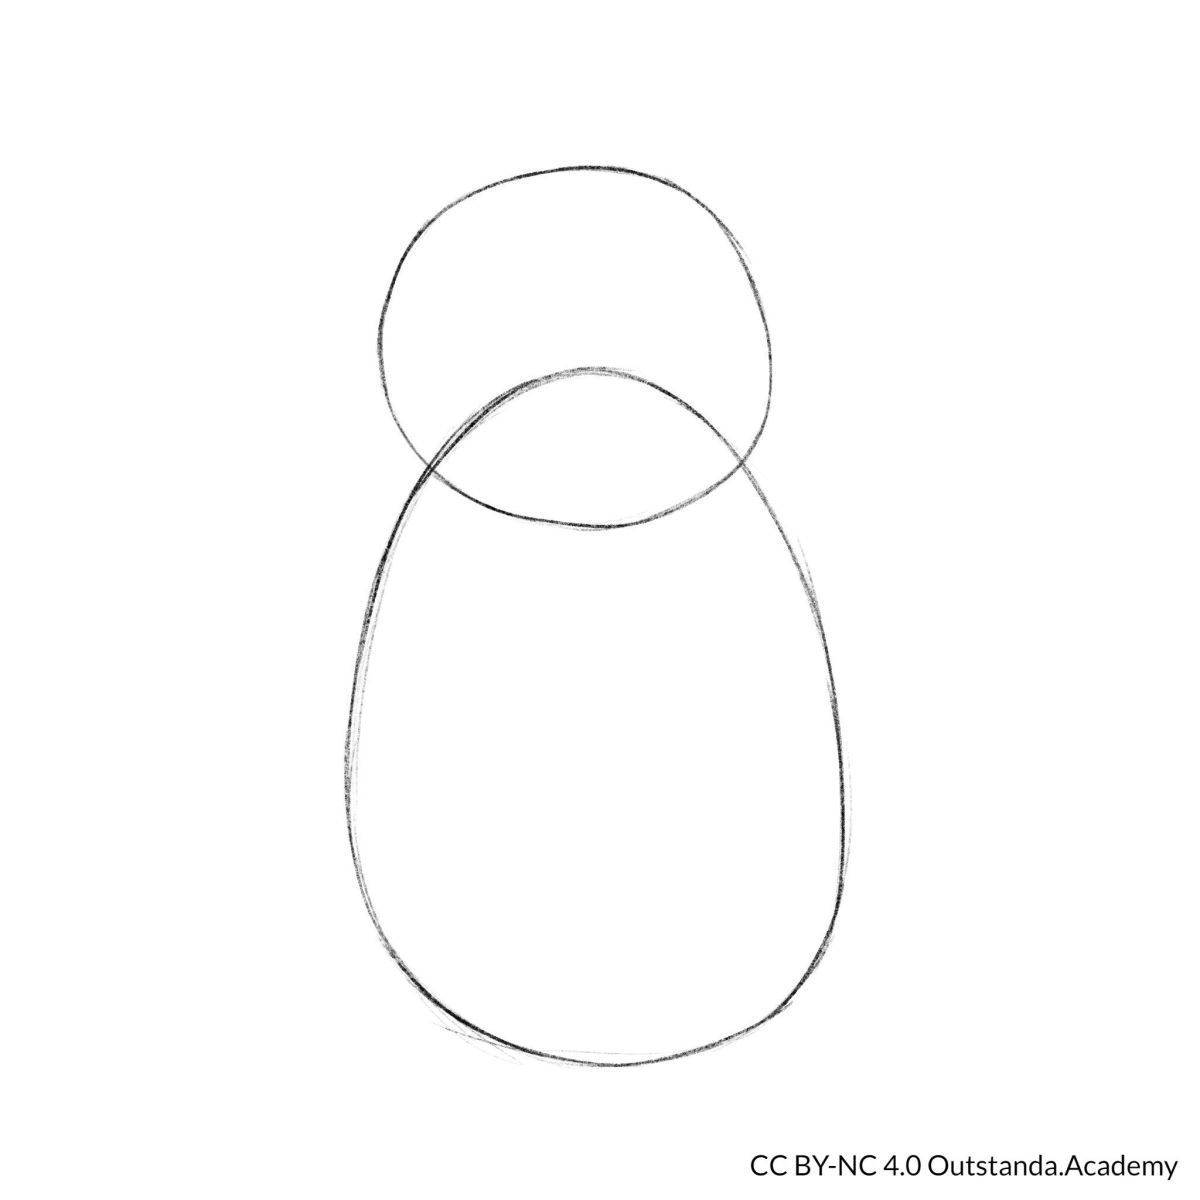
Using this guide, practice drawing a cat.
Begin by making a rough outline of the cat.
Add more details such as legs and paws.
.jpeg)
Add ears and more defined contours.
.jpeg)
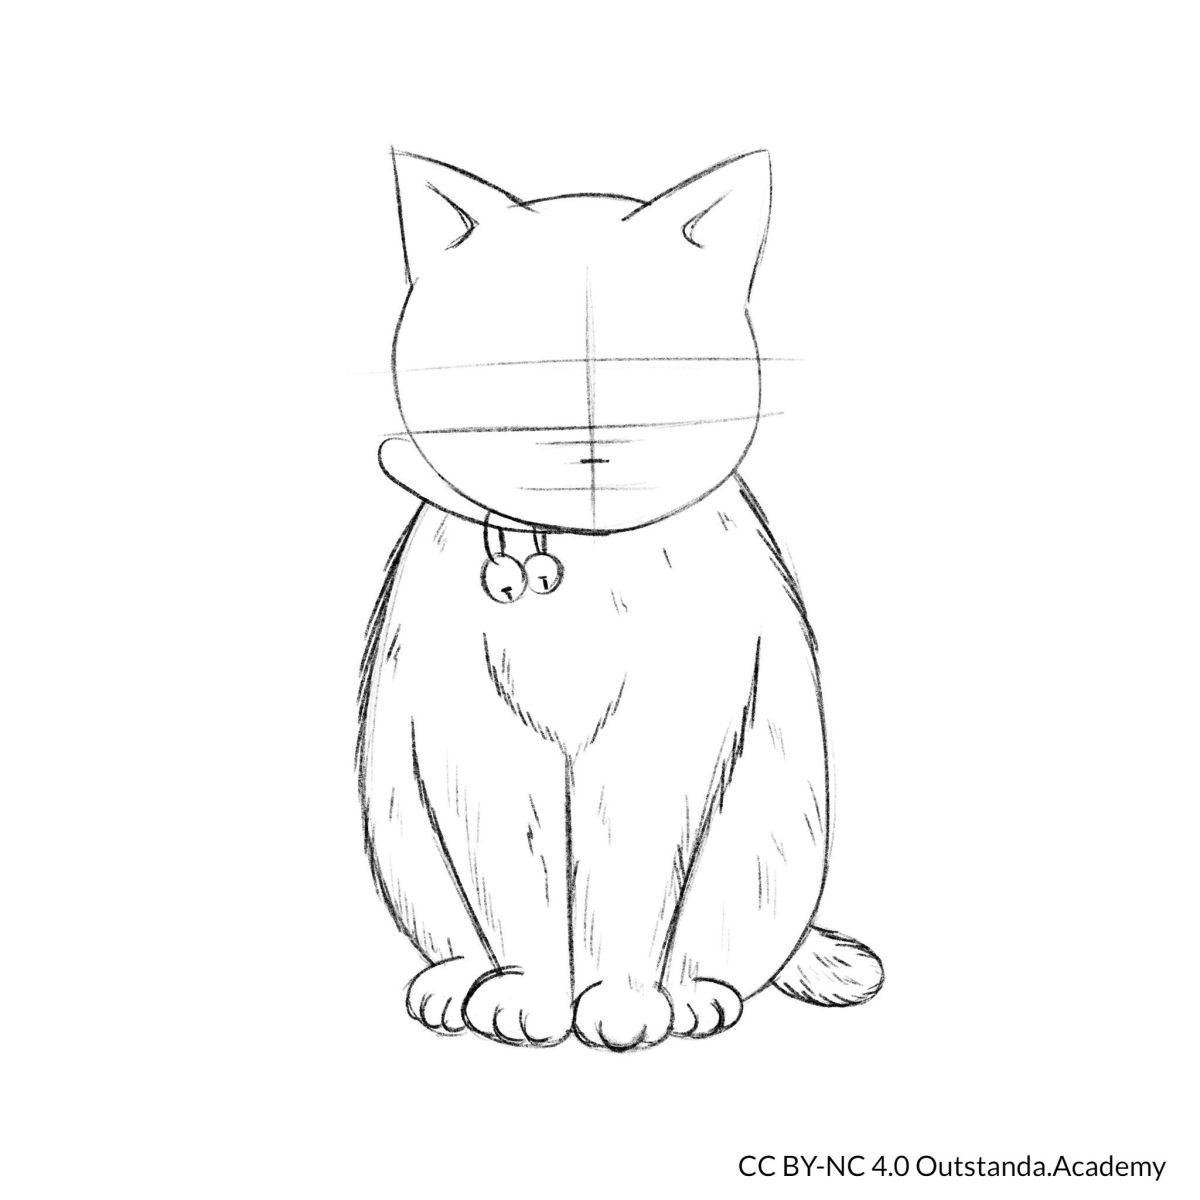
Carefully erase some guidelines and add more detail to paws, chest, and legs.
.jpeg)
Plan out cat face and collar.
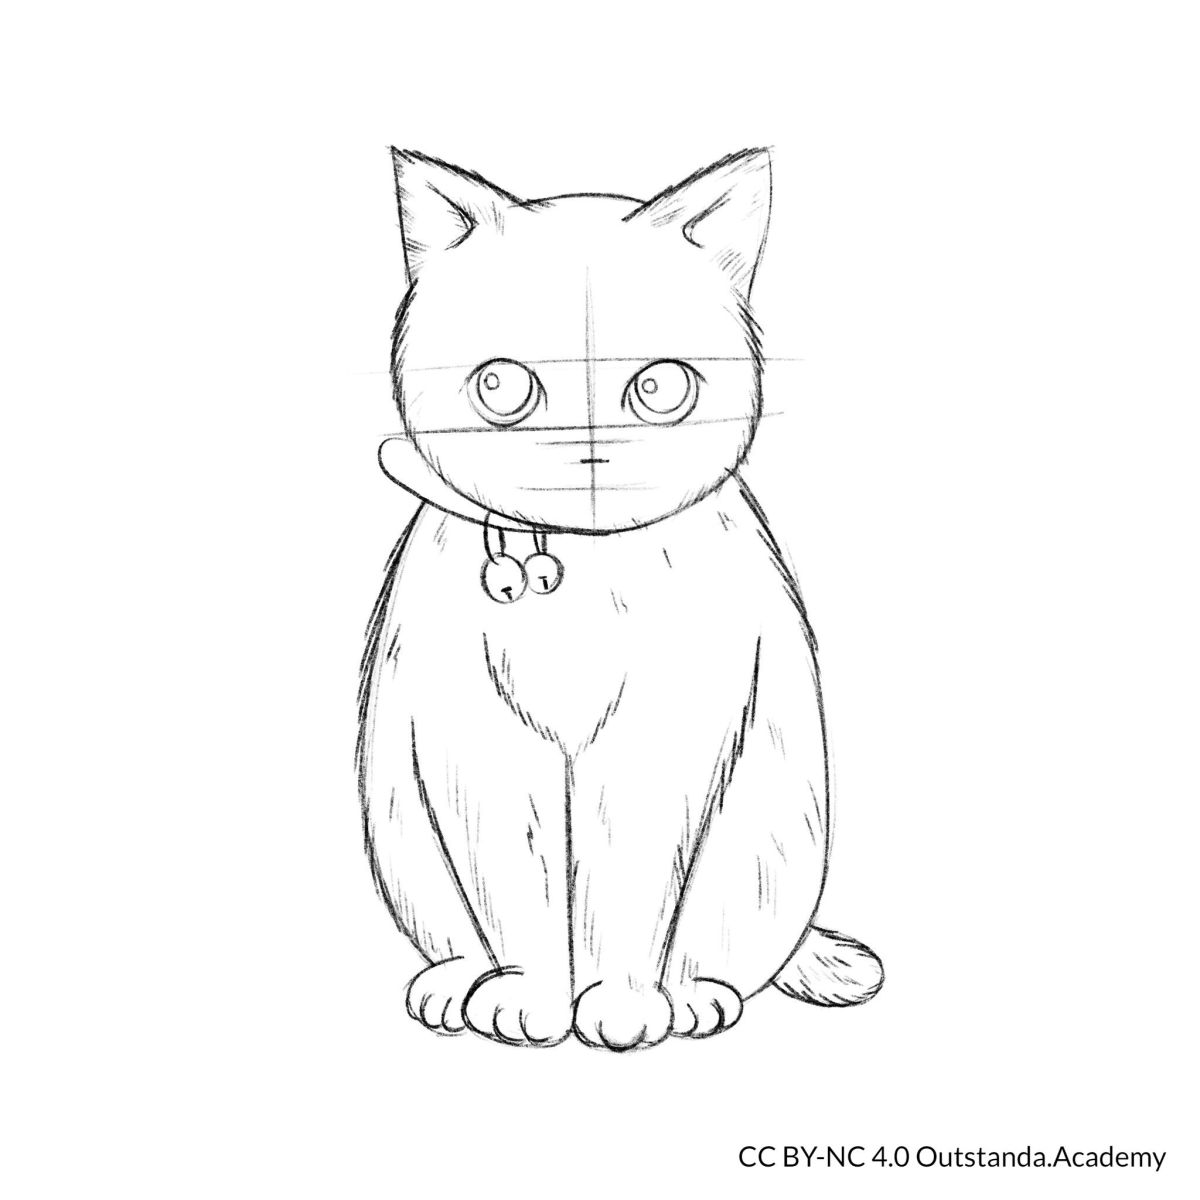
Add rough cat eyes.
Add cat mouth and whiskers.
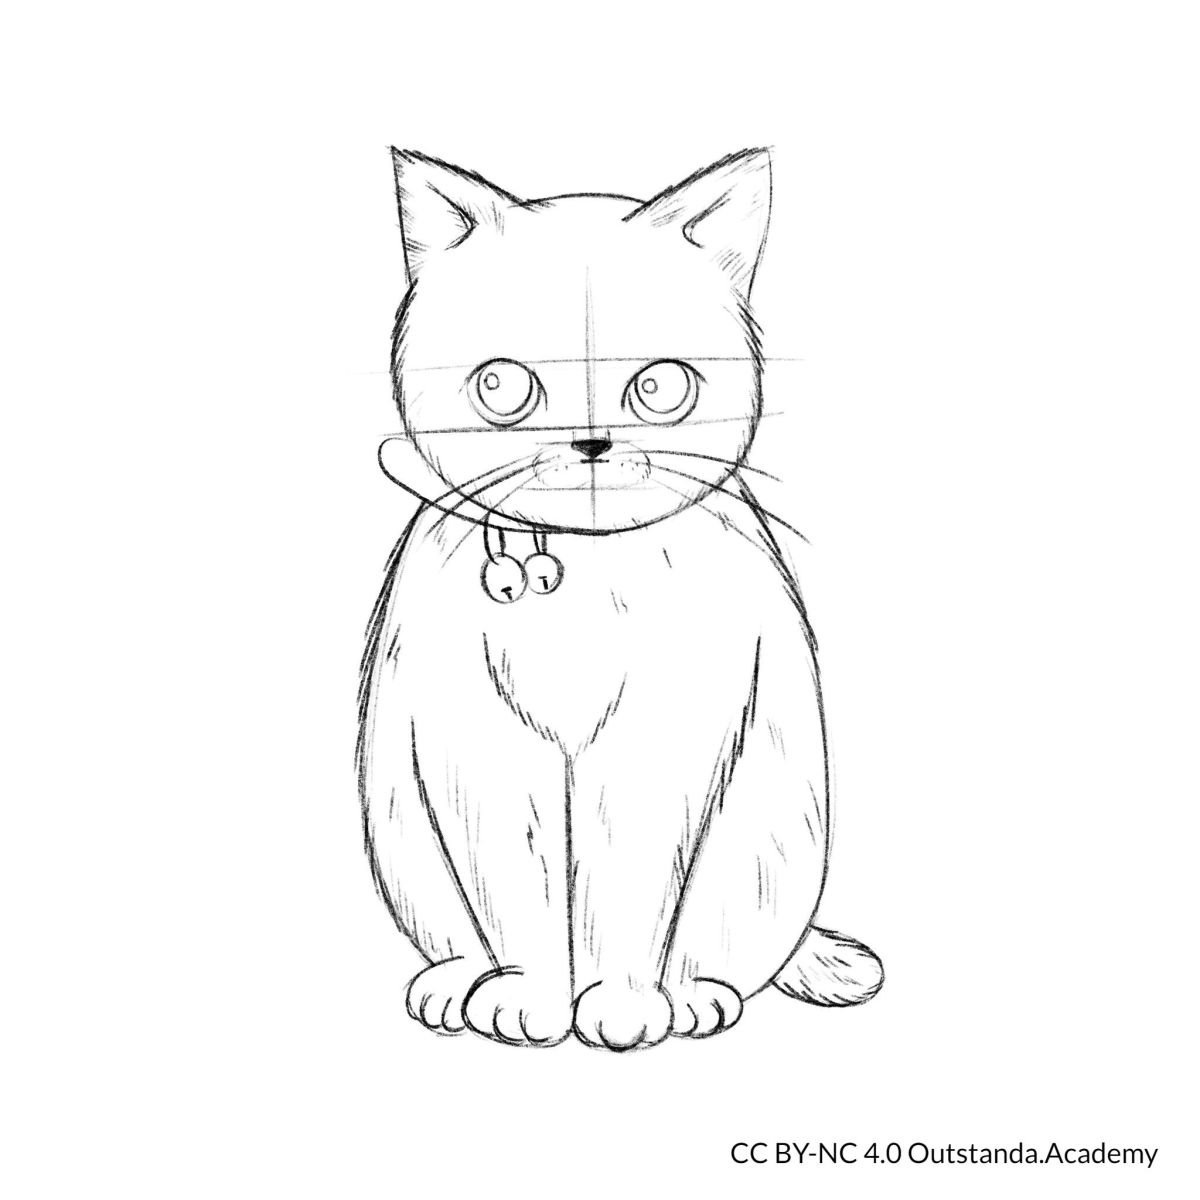
Carefully remove remaining guidelines and add shading and detail to bring your cat to life.
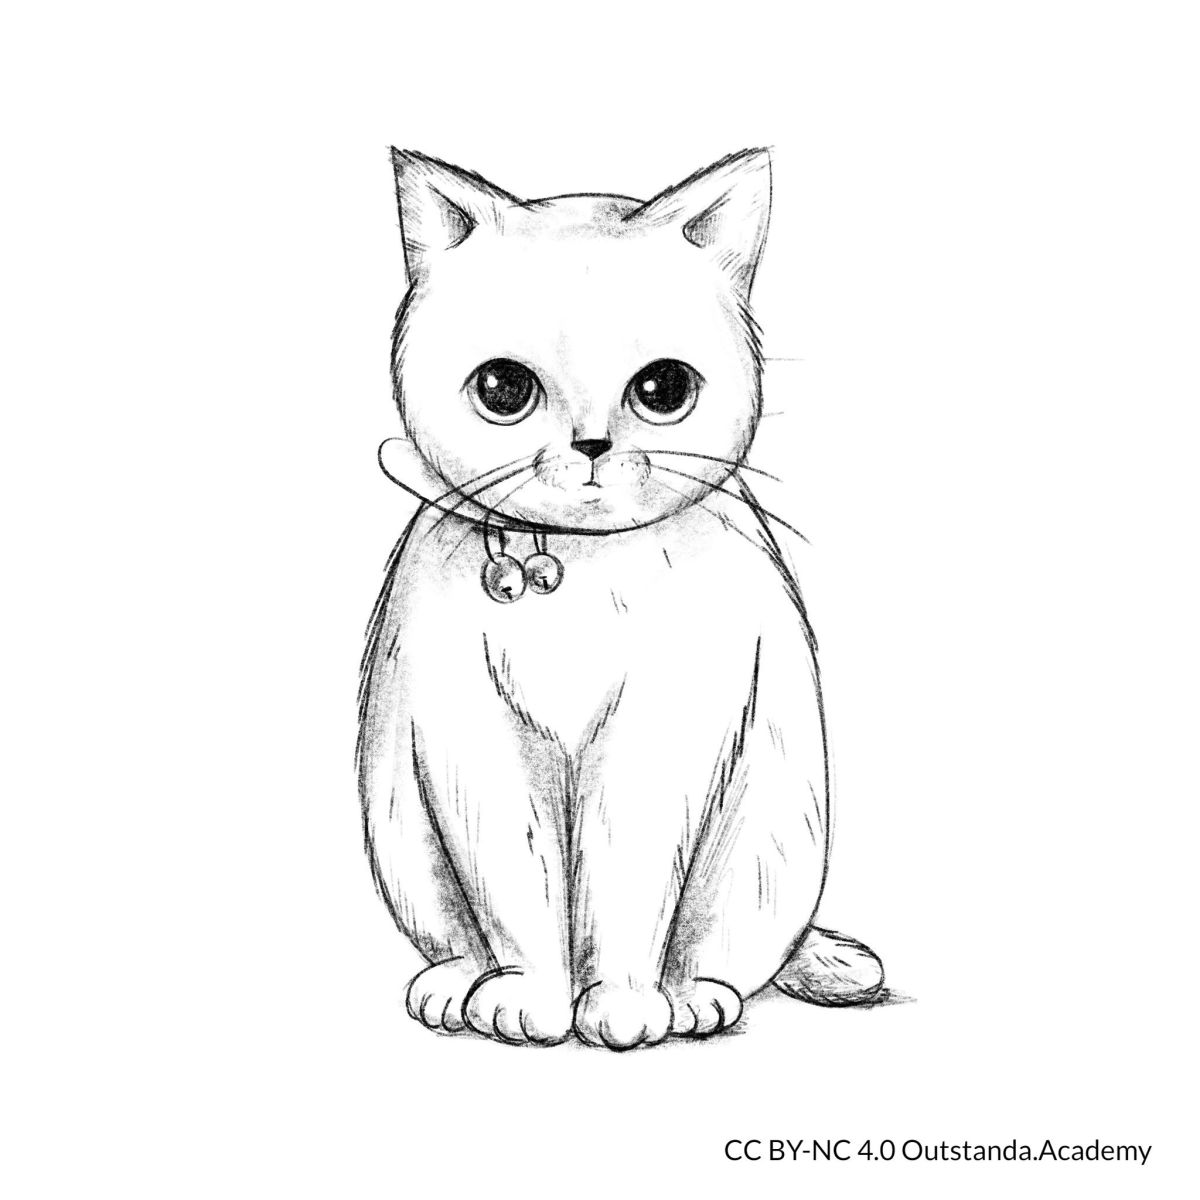
Draw a cat - step by step.
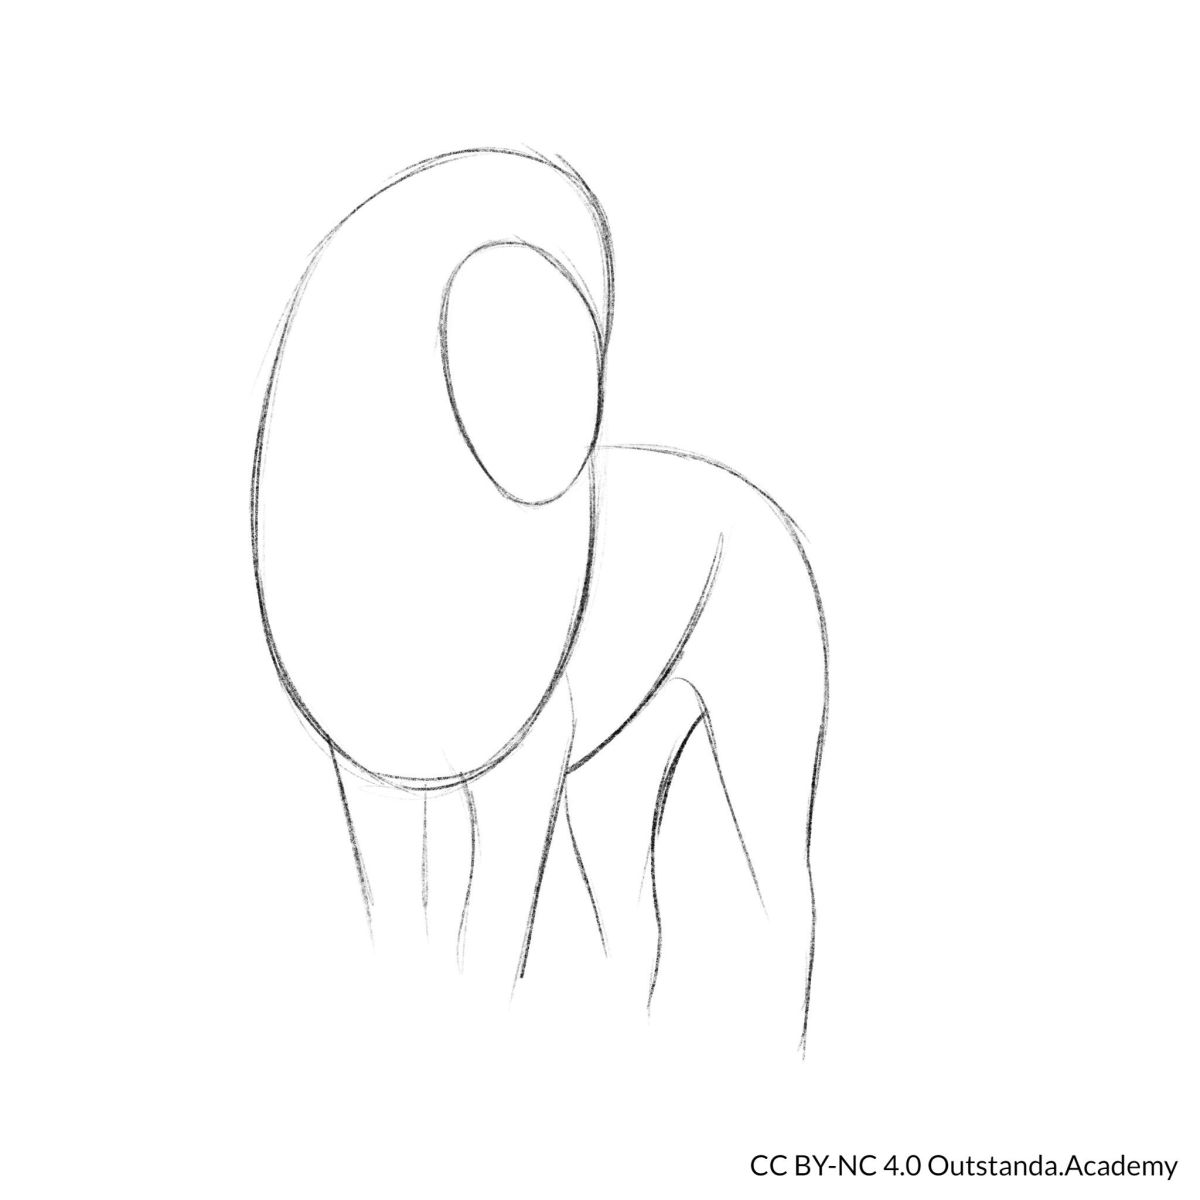
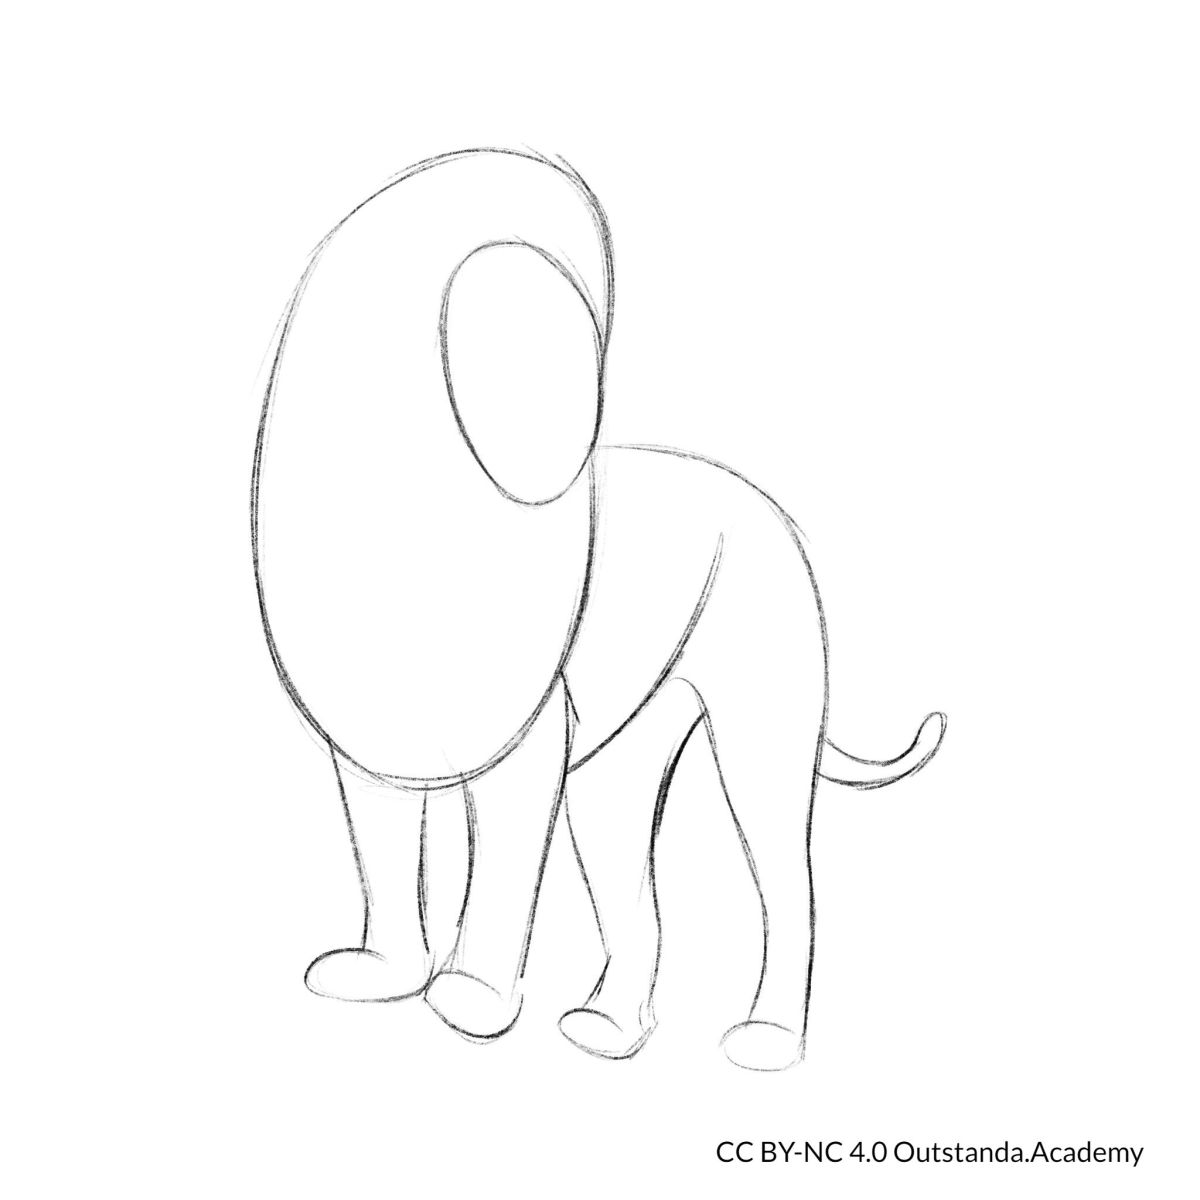
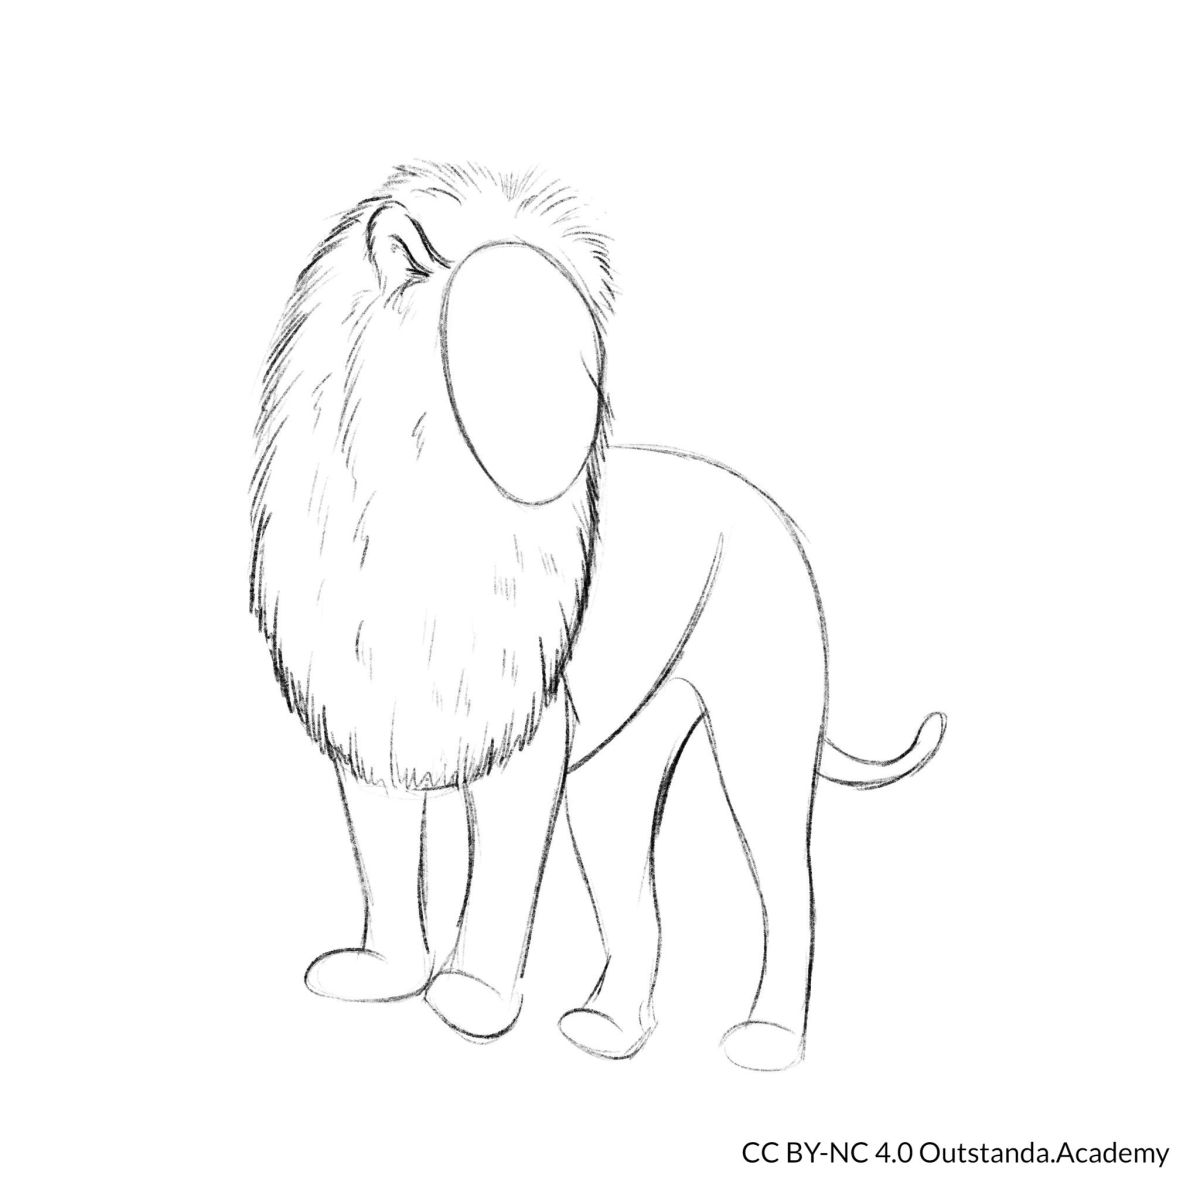
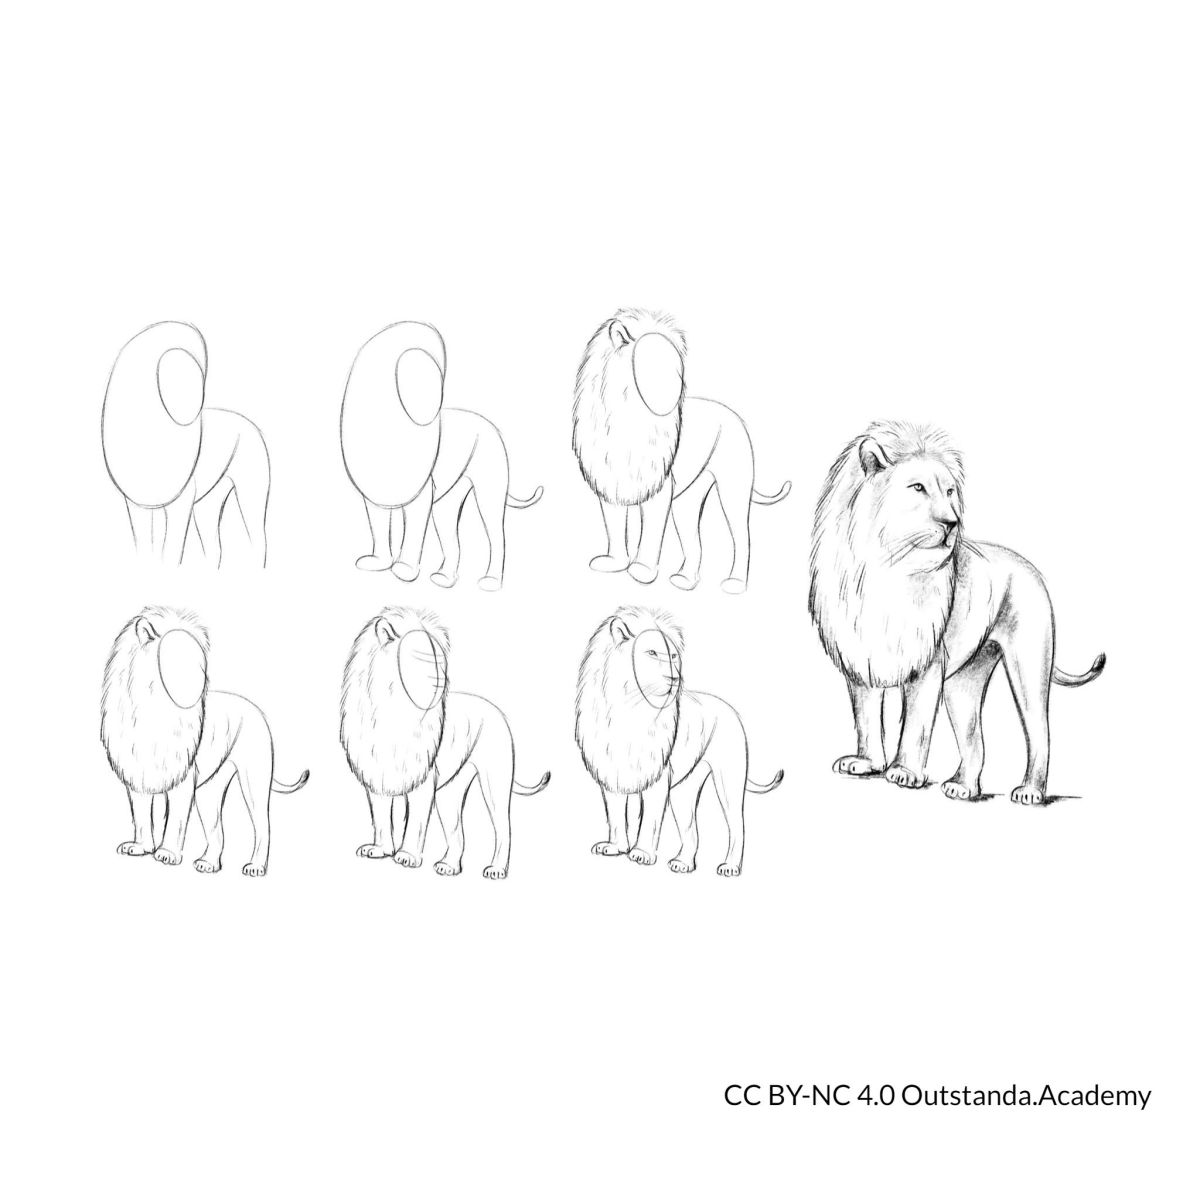
Draw a Lion - Step by Step
Follow along and draw a lion. This step-by-step tutorial shows students how to plan and draw a lion.
Begin with a rough lion layout.
Add more details to the paws and tail of the lion when you are happy with the proportion
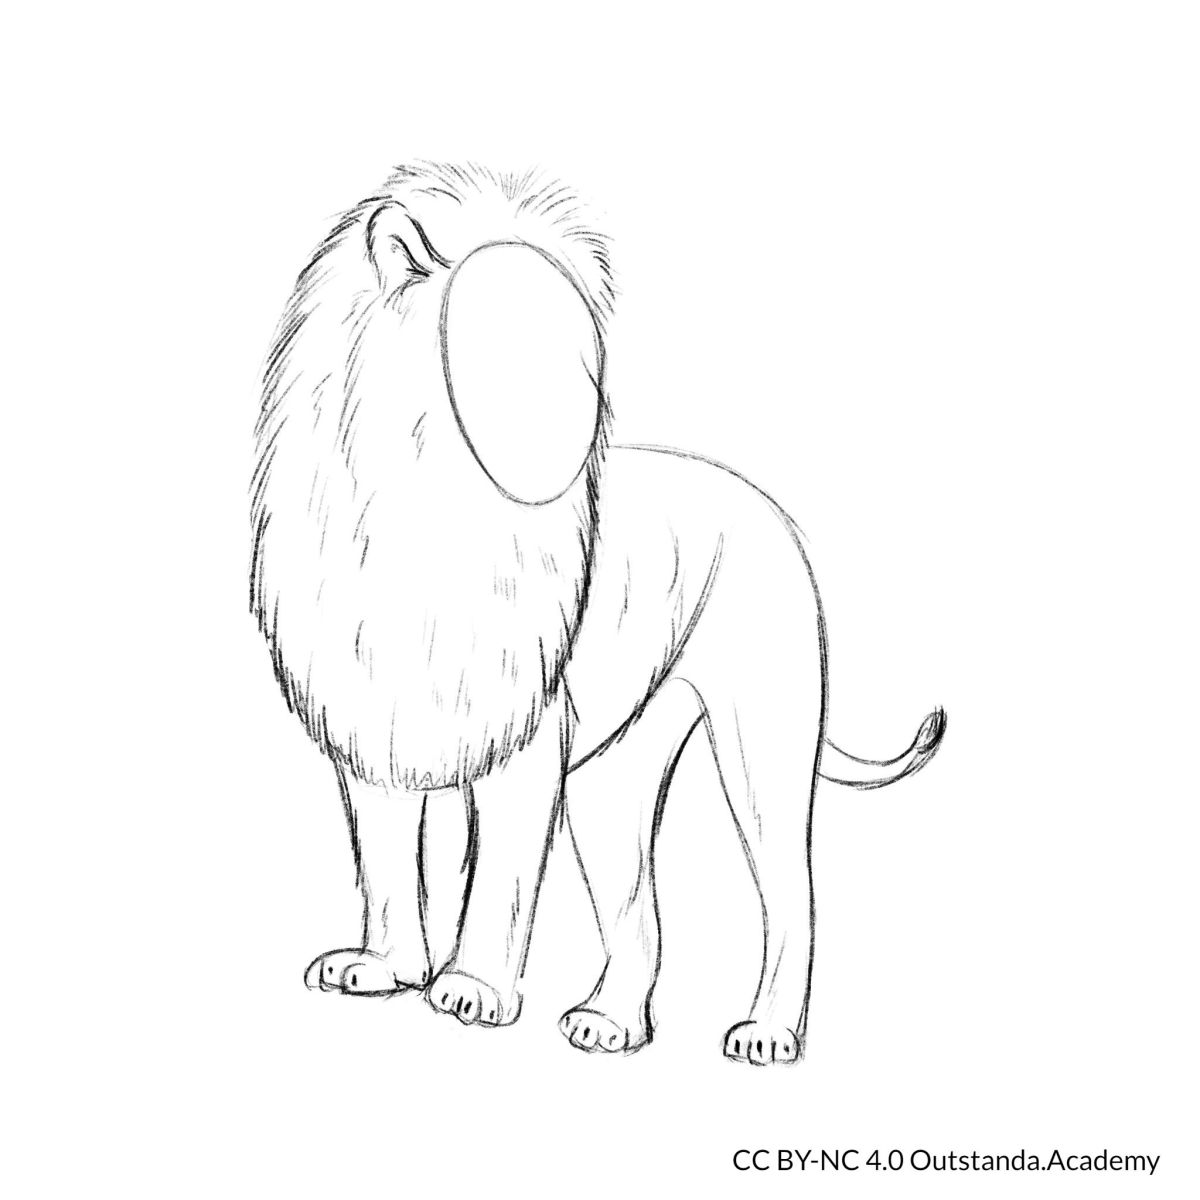
Add the ear and mane of the lion.
Make claws and muscle contours more defined on the lion.
Plan the layout of the lion's face.
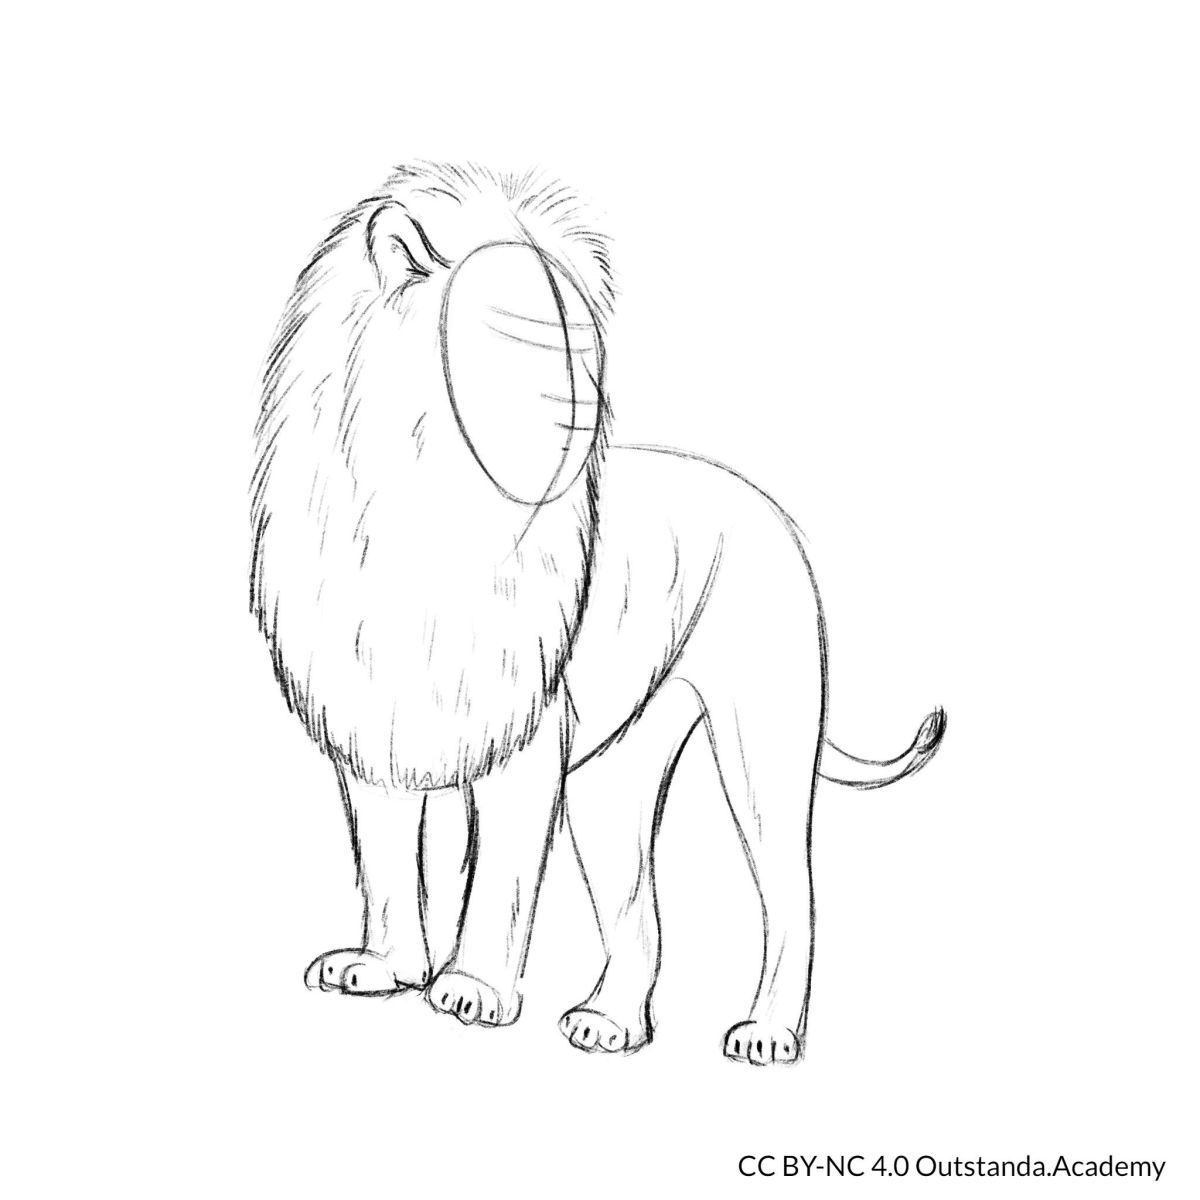
Add eyes, nose, and mouth to lion face.

Carefully erase rough lines and fill in the details to make your lion lifelike.
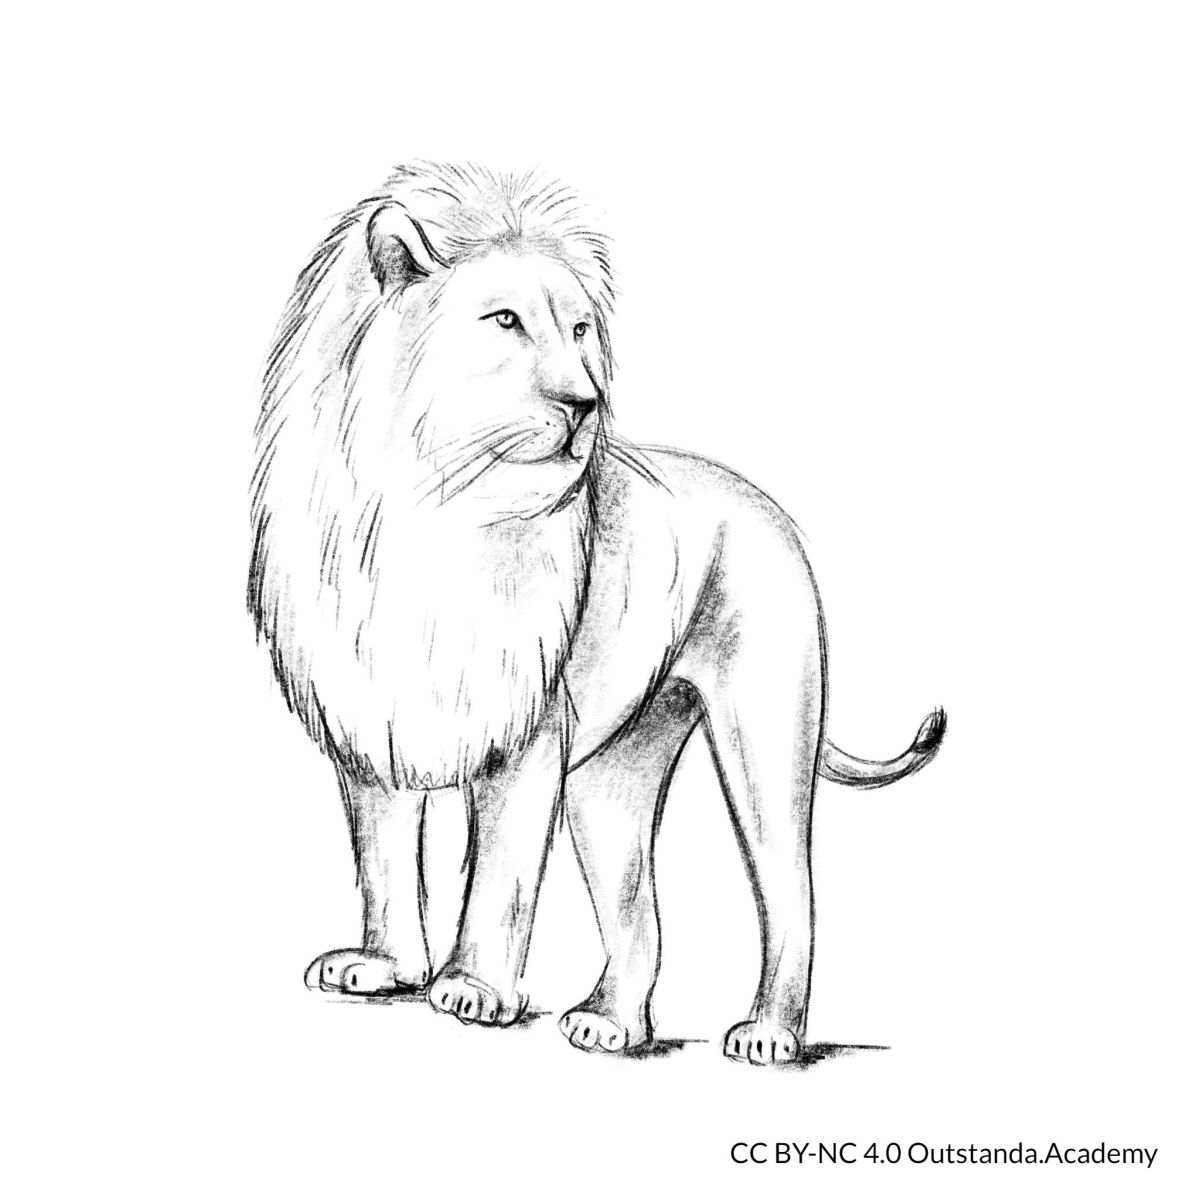
Here are the steps to draw a lion.
Mythical Animal Prjoject
Project Plan: Mythological Creature Creation
Objective: To stimulate creativity and imagination among young artists by creating a unique mythological creature using three different animals.
Materials Needed:
1. Drawing paper
2. Pencils, erasers, and sharpeners
3. Colored pencils, markers, or paints
4. Computer with internet access (for those using the online random animal generator)
5. Small pieces of paper and a container (for those using the folded paper method)
Procedure:
1. Introduction (Day 1): Begin by discussing various mythological creatures from different cultures. Talk about how these creatures often combine elements of different animals. Explain the project and its objectives to the students.
2. Animal Selection (Day 1): Watch the video in this lesson where an artist creates a fairy dragon. Then students will randomly select three different animals. They can either use the online random animal generator at https://randommer.io/random-animals or draw names of animals from a container filled with folded papers. Each paper should have the name of a different animal written on it.
3. Research (Day 2): Students will research their selected animals, focusing on their physical characteristics, habitats, and behaviors. This will help them in the next step when they start to combine these features.
4. Sketching (Day 3 - Day 4): Students will start sketching their mythological creature, combining elements from each of their three animals. Encourage them to think about how the creature might move, what it might eat, where it might live, etc. They should create several rough sketches before deciding on a final design.
5. Final Drawing (Day 5 - Day 7): Students will create a final, detailed drawing of their mythological creature. They can use colored pencils, markers, or paints to bring their creature to life.
6. Presentation: Each student will present their mythological creature to the class. They should explain which animals they chose, why they chose to combine the features they did, and any other interesting details about their creature.
Assessment: Students will be assessed on their creativity, their research, the thoughtfulness of their design, and their presentation.
Note: This project plan is flexible and can be adjusted based on the age and skill level of the students, as well as the time available.